Friday 20 September 2013

Simple Gluten Free Pumpkin Cupcakes with Cream Cheese Frosting

Fall is finally here and with it comes pumpkin flavored deliciousness!  I LOVE fall; the smells and the colors and particularly pumpkin.  I find it frustrating, as someone unable to eat gluten, to try to find baking recipes that don't require an intensely complicated (and costly) mix of flours and specialty ingredients.  Below is a recipe that, after much experimentation, resulted in fluffy, moist cupcakes boasting the flavors of fall without breaking the bank.

What you need:

Cupcakes - 
1/2 cup butter, softened
1 cup sugar
2 eggs
1/2 tsp cinnamon
1/2 tsp nutmeg
3/4 cups white rice flour
1/2 tsp xanthum gum
3/4 cups almond flour
1 tsp baking powder
1/4 tsp salt
1/2 cup pumpkin
1/4 cup milk

Preheat oven to 350 degrees and lining cupcake tin with paper liners.

Mix butter with sugar until fluffy.  Add eggs, one at a time, mixing until combined. Combine all dry ingredients and add to butter mixture, mixing well.  Stir in milk and pumpkin.  

Pour batter into lined cupcake tins and bake for 20-25 minutes.

Frosting - 
1 package cream cheese
1/4 cup butter, softenend
2 cups icing sugar

Beat all ingredients until smooth and frost cooled cupcakes.

Enjoy!

Tuesday 10 September 2013

DIY Cupcake Stand - Wedding

 
 I was married in April of this year to the man of my dreams.  Planning and preparing for our wedding was a great adventure in creativity and in the end we were so fortunate to have an amazing and elegant day that went of without a hitch.  We did as much as we could ourselves (from creating this cupcake stand to building a wedding arch) in order to stretch our budget as far as possible.  I look forward to sharing information about our wedding projects!


 The base of our cupcake stand is made of hat boxes from The Creative Bag Company.  I purchased small vases from Dollarama, filled them with wine corks and glued these to the bottom of silver plastic chargers, in order to make a sturdy second tier. Finally I found a small cake plate at Homesense and an initial cake topper from Party City to present a small cutting cake. 


Though we did not incorporate a great deal of color into our wedding décor, we did allow the cupcakes to stand out by choosing a wide variety of flavors from a local bakery (that has a great gluten-free selection) For the Love of Cake.  The cupcakes were absolutely delicious and looked stunning!
 

DIY Baby Nursery Wallart


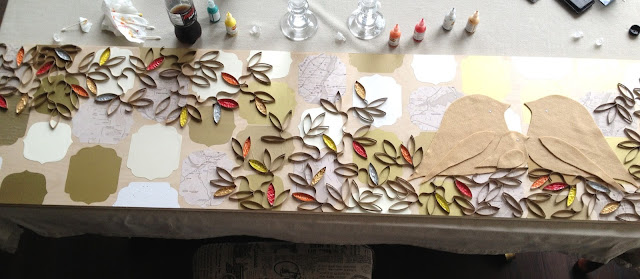
Using various materials that I found around our place, I made this wall art for our little princess's bedroom this weekend.  With a piece of plywood, some scrap paper and felt, toilet paper rolls and puff paint we brought some warmth to the otherwise cold concrete wall behind her crib.
 First, I cut out three birds from felt scraps to represent our growing family.  I then bent toilet paper rolls in half and cut 1/4 inch slices to create leaves and cut 1/4 inch lengthwise strips from other rolls to create stems. I lay these out in a pattern to create branches for the birds to sit on. 


Next, using some scraps of paper (from various wedding related projects) as well as some maps of places that my husband and I have travelled together I cut out shapes to create a graphic pattern in the background.  I glued these down with watered down craft glue before gluing down the leaf and stem pattern and finally the felt birds.


With fabric puff paint I filled in some leaves to bring in some color and finally, sprayed the entire piece with a high gloss clear spray-paint.


Monday 9 September 2013

Lemon Tart Recipe (Gluten Free)


I made this delicious lemon tart for my husband's birthday over the weekend and it was a huge hit! The Gluten-Free crust is a perfect shortbread base and the lemon topping is a creamy mix of tart and sweet.  I believe in keeping things simple and could not be more excited to have a pie crust recipe ready to go that requires only a few ingredients but still tastes amazing!

What you'll need:
Crust -
3/4 Cup Softened Butter
1/2 Cup Sugar
1 Cup Rice Flour
1/2 Cup Glutinous Rice Flour
12 Tsp Xanthum Gum

Topping -
4 Eggs
1 1/2 Cups Sugar
1/4 Cup Rice Flour
2 Lemons, Juiced

9 inch Round Pie Plate lined with parchment
350 Preheat Oven

Directions:

1. Combine all crust ingredients with a mixer and press into the lined pie plate. Bake for 30 minutes or until it begins to brown around the edges.
2. Combine all topping ingredients with a mixer and pour over crust.  Bake for a further 20 minutes and you are done!

Tuesday 3 September 2013

Baked Chicken Meatball Recipe

As dinner hour approaches I sometimes find myself at a loss for ideas for meals that taste good, are affordable and that my husband will enjoy enough to want to take to work for lunch the next day. We have a fairly spicy palate in my home, I introduced my better half to jalapenos and he has never looked back, so please feel free to adjust to your taste.  That said these meatballs are great with pasta, on a sandwich or over rice with tomato sauce.  I hope you enjoy!


 Ingredients - 
1 Pound Ground Chicken (turkey would work just as well)
1 Jalapeno
1 Tablespoon Red Pepper Flakes
1 Tablespoon Dried Oregano
1 Tablespoon Basil
1 Egg
(Optional) 1/4 Cup Cheese of any kind

Preheat oven to 350 degrees F.  Add chicken to a mixing bowl and all other ingredients to a blender.  Blend until pepper is finely diced.  Add blender mix to chicken and fold into meat (do not over mix or chicken will cook to be quite dense).
Using two spoons create approximately 20 meatballs on parchment lined baking sheets and bake for 18-20 minutes or until liquid from meat runs clear. 

At this point I add the meatballs to a homemade (or store bought tomato sauce) and simmer for 20 minutes so the meat takes on the sauces flavors. Overall this creates a quick and easy meal that we enjoy over at least two meals.


Angora Baby Ballet Wrap -Free Pattern (18 Months)


I am very lucky to have a little princess on the way in a few months (around Christmas in fact!) and have begun making her a wardrobe, as my mum did for me and her mother did for her.  With only 2 10 gram balls of White Angora, I put together this simple ballet wrap sweater (impractical color perhaps, but a lovely luxury) in just a few hours and thought I would share how I did it.

Materials Required-

Ribbon
2 10 gram balls of Angora (or comparably weighted yarn)
1 pair of 4 mm needles

Finished Size-

18 Months 
Chest Size 22 inches
Length 11 inches


*KFB (knit in front and back) Knit next st without removing it from the left needle, then knit through the back of the same stitch to increase by 1 stitch


Back: Cast on 58 stitches.  Work in Stocking Stitch (Knit on right side and Pearl on wrong side) until piece measures 11 inches from beginning.  Bind off.  (Piece measures 11 by 11 inches)


Right Front: Cast on 55 stitches.  Work in Stocking Stitch until piece measures 4 1/2 inches from beginning, ending with a Wrong Side row. 

Right Side rows - At beginning of next row, Knit 2, then Knit 2 together, Knit across remainder of row (now 54 stitches on the needle).
Wrong Side rows - Purl across row to last 4 Stitches, Purl 2 together, Purl last two stitches.
Repeat last two row until 19 stitches remain.  Work in Stocking Stitch until piece measure 11 inches, bind off.

Left Front: Cast on 55 stitches.  Work in Stocking Stitch until piece measures 4 1/2 inches from beginning, ending with a Wrong Side row. 

Right Side rows - Knit across row to last 4 Stitches, Knit 2 together, Knit last two stitches (now 54 stitches on the needle).
Wrong Side rows - At beginning of next row, Purl 2, then Purl 2 together, Purl across remainder of row.
Repeat last two row until 19 stitches remain.  Work in Stocking Stitch until piece measure 11 inches, bind off.

Sleeves: Cast on 36 stitches. Work 4 rows of Stocking Stitch, beginning with a Right Side, Knit row. 

Next row, Knit 1, KFB, Knit to last 2 stitches, KFB, Knit 1 (now 38 stitches on the needle). Work 3 rows in Stocking Stitch. Repeat last 4 rows 6 times (now 50 stitches on the needle). Work in Stocking Stitch until piece measures 5 1/2 inches, bind off.

Finishing:  Sew lengths of ribbon (enough to wrap around and tie in front) to each sides of the Front at the beginning of the decrease rows.  Sew shoulder seams, sleeves to body and sleeve seams. Sew side seams, leaving a gap on the Right seam (large enough to fit your ribbon through) 4 1/2 inches up from lower edge. Weave in ends and you are done!


Simple and Incredibly Rich Flourless Chocolate Cake (Gluten-Free)


I would like to say that my incessant chocolate cravings are a result of my pregnancy, but in all honesty there is nothing that I love to eat more then something as rich as flourless chocolate cake.  This cake will impress even the most discerning palate with it's smooth and buttery flavour but has the added bonus (for those like me who are allergic to gluten) of being gluten free.  It takes only 45 minutes to prepare, including cook time, so it is great way to wrap up a dinner party or for just for a treat to keep in the freezer for days when you need a little something special.

This recipe is an adaptation of Flourless Chocolate Cake by Linda Larsen, About.com Guide to Busy Cooks.


What you'll need:

8 Inch Round Cake Pan with bottom lined with Parchment Paper


Cake Ingredients-

6 Ounces of Semisweet Chocolate 
1/2 Cup of Unsalted Butter
3/4 Cup of Sugar
3 Large Eggs
1/2 Cup Cocoa
1/4 Teaspoon Salt

Glaze Ingredients-

2 Ounces Semisweet Chocolate
3 Tablespoons Butter
1/4 Cup Whole Milk or Cream

Preheat oven to 350 degrees Farenheit.


You will have 6-8 servings of chocolaty goodness.


Prep time (approximately 20 Minutes):


1. Chop up 6 Ounces of Chocolate and melt with butter in a saucepan over medium low heat until smooth.
2. Reduce heat to low and add sugar and salt, stirring for one minute.
3. Remove pan from heat and mix in eggs, one at a time until mixture has glossy appearance.
4. Mix in sieved cocoa (to avoid lumps) and pour into prepared pan.
5. Bake for 25 minutes or until the center of the cake is slightly firm to touch.
6. Prepare glaze, while cake is inverted and cooling on a plate, by melting 2 Ounces of Chocolate with butter.
7. Remove from heat when chocolate mixture is appears smooth and add milk, mix.
8. Pour over cake and spread with spatula as required.